
How to create a Ticket for an event?
By support
Eventdex Knowledge Base How to Create a Ticket for an Event
Learn how to create and configure event tickets in Eventdex,
including pricing, visibility, registration, badges, and
other ticket options.
Quick Path 1
Eventdex Portal › 2
Select Event › 3
Ticketing › 4
Tickets › 5
Create Ticket Before You Begin
Make sure you have access to the
Eventdex Portal and the appropriate
permissions to manage tickets for your event.
1
Open Your Event
Go to the Eventdex Portal, log in with
your credentials, and select the event where you want
to create the ticket.
Navigation:
Eventdex Portal → Login → Select your Event 2
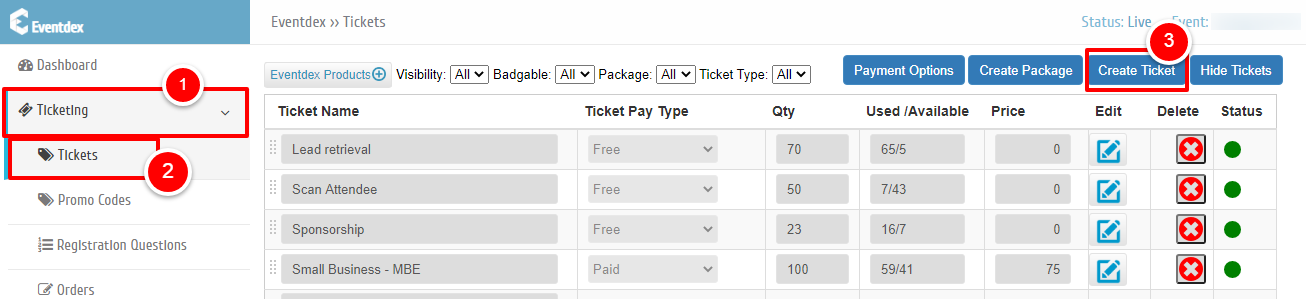
Open the Tickets Section
From the event dashboard, expand
Ticketing in the left navigation menu
and select Tickets.
Tip:
Make sure you are working inside the correct event
before creating or modifying tickets. 3
Create a New Ticket
Click the Create Ticket button at the
top-right of the Tickets page.

4
Enter the Basic Ticket Information
Enter the basic information for your ticket.
Ticket Name
Name displayed for the ticket.
Ticket Pay Type
Select Paid, Free, or Donation.
Quantity
Total number of tickets available.
Price
Price charged for each ticket.
5
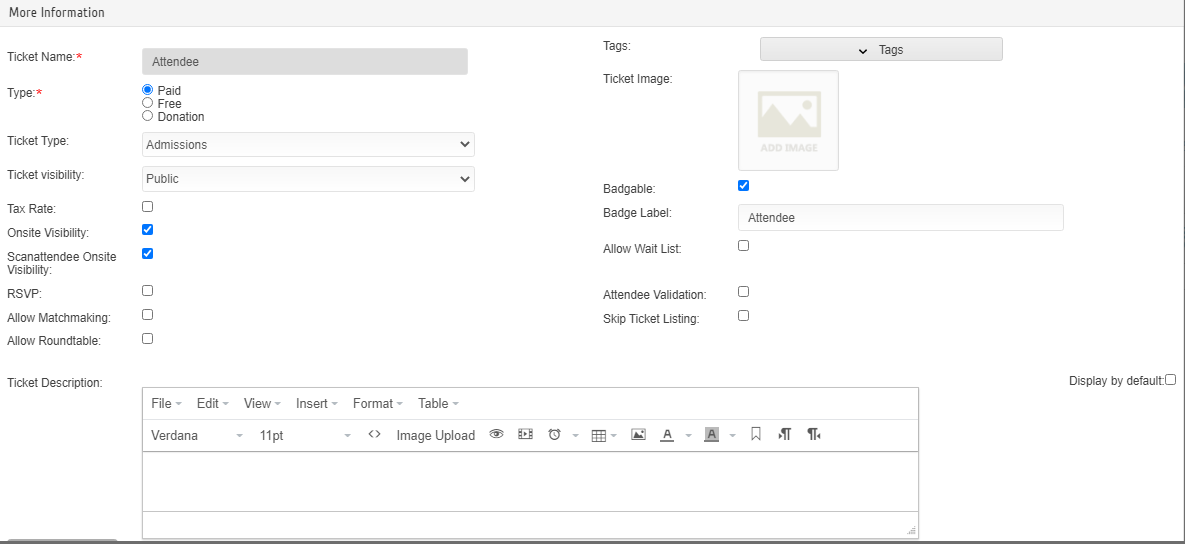
Configure Additional Ticket Settings
To configure additional ticket information, click the
More Information icon associated with
the ticket.
Ticket Configuration
Ticket Type:
Choose the appropriate ticket type for your event.
- Admission – Regular attendee admission.
- Exhibitor – Exhibitor attendees.
- Sponsor – Sponsor attendees.
- Speaker – Speaker attendees.
- Seats – Select seats from a predefined layout.
- Seminars – Create seminar tickets.
- Booths/Tables – Display exhibitors in the Eventdex App.
- Sponsorship – Display sponsors in the Eventdex App.
- Items – Add items.
- Staff Admissions – Staff admission tickets.
Ticket Visibility:
Controls who can see the ticket.
- Public – Displayed on the registration page.
- Private – Available through a private registration link.
- Closed – Not displayed on the registration page.
Tax Rate:
Turn tax ON or OFF for the individual ticket.
Eventdex Products
Certain ticket types can provide access to
Eventdex products.
- Lead Retrieval – Provides exhibitor
access to the Eventdex Lead Retrieval app. - MatchLeads Buyer – Provides buyer
access to one-on-one meetings. - MatchLeads Seller – Provides seller
access to one-on-one meetings. - Scan Attendee – Provides access to
attendee scanning, registration, badge printing,
ticket sales, check-in/out, and event statistics.
Onsite & Check-In
Quick Registration Onsite Visibility:
Enable this option to display the ticket for
Self-Service Quick Registration.
Scan Attendee Self-Check-In Visibility:
Enable this option to display the ticket for
self-check-in mode and from the app.
Engagement & Networking
Allow Matchmaking:
Enable this option if ticket holders will participate
in Matchmaking.
Allow Roundtable:
Enable this option if ticket holders will participate
in Roundtable sessions.
Badge & Identification
Tags:
Add tags to categorize or identify the ticket.
Ticket Image:
Add an image to the ticket. The image size should
not exceed 100 KB.
Badgable:
Enable this option to make the ticket eligible
for badge printing.
Badge Label:
Defines the label displayed on the attendee badge.
Registration Controls
Allow Wait List:
Enable this option to allow attendees to join a
waitlist when ticket demand exceeds availability.
Attendee Validation:
Enable this option to validate registrant email
addresses for offers applied to purchased tickets.
Attendee Email Restriction:
Use this option when attendee registration should
be restricted based on email criteria.
Skip Ticket Listing:
Enable this option to skip ticket selection on the
registration page and send registrants directly
to the registration form.
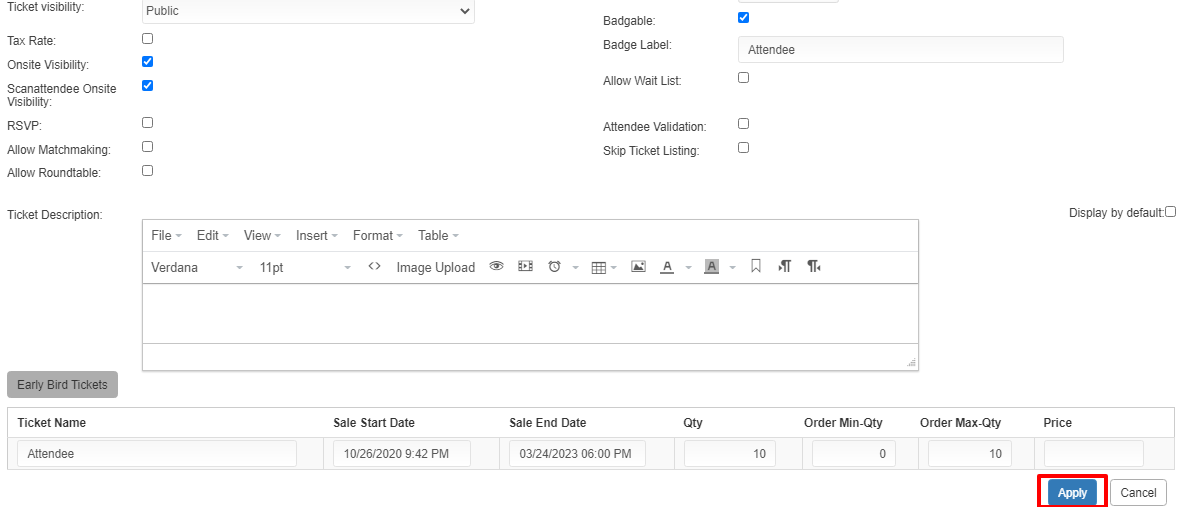
Sales & Quantity
| Setting | Description |
|---|---|
| Ticket Description | Add a short description for the ticket. |
| Sale Start Date | Defines when ticket sales begin. |
| Sale End Date | Defines when ticket sales end. |
| Quantity | Total number of tickets available for sale. |
| Order Min-Qty | Minimum number of tickets a registrant must purchase. |
| Order Max-Qty | Maximum number of tickets a registrant can purchase. |
| Price | Price of the ticket. |
6
Apply Your Ticket Settings
After entering all required ticket information,
click Apply to confirm the entries.
If you do not want to save the changes,
click Cancel.
7
Save the Ticket
After applying the ticket settings, click
Save to create the ticket.
Click Cancel if you want to exit
without saving.

✓ Ticket Created Successfully
Your ticket is now available according to the visibility,
sales dates, quantity, and other settings you configured.
Quick Reference Path
Eventdex Portal → Select Event → Ticketing → Tickets
Action
Click Create Ticket
Configure
Ticket type, pricing, visibility & additional settings
Finish
Click Apply, then Save
Need Help?
If you have questions about creating or configuring tickets,
please contact the Eventdex Support Team.