
Managing Tickets in Eventdex: Create, Edit, Packages, Early Bird & More
By support
TICKETING & EVENT MANAGEMENT Managing Tickets in Eventdex: Create, Edit, Packages, Early Bird & More
Create and manage tickets, packages, Early Bird pricing, tags, orders, and registration questions from your Eventdex event.
① Create Ticket
② Edit / Delete
③ Create Package
④ Early Bird
⑤ Manage Tags
⑥ Orders
⑦ Order Status
⑧ Registration QuestionsBefore you begin:
Make sure you have access to your Eventdex event and the required event management permissions. 01 · TICKETS
Create a Ticket
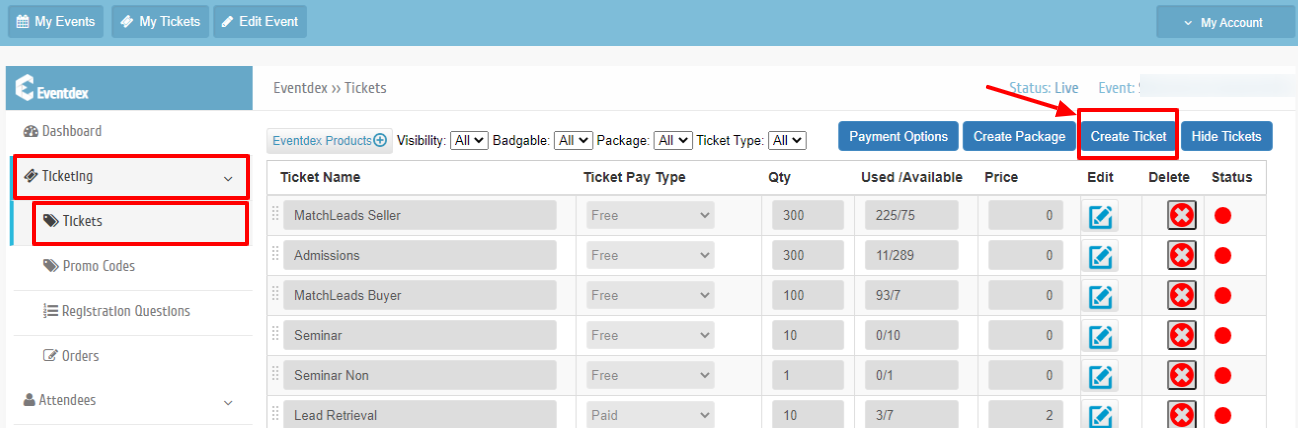
To create a new ticket, go to
Eventdex >> Ticketing >> Tickets >> Create Ticket.
1
Open Create Ticket
Click Create Ticket to add a new ticket to your event.
2
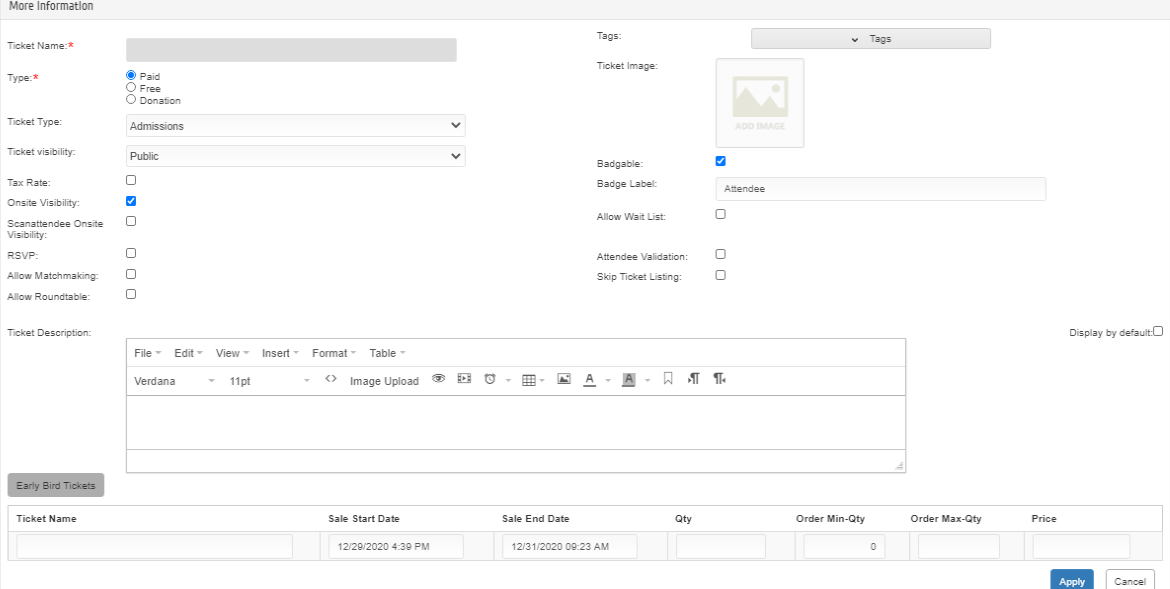
Enter the Basic Ticket Details
Enter the required ticket information:
Ticket Name
Required Ticket Pay Type
Required Ticket Qty
Required Price
Required
To configure additional ticket settings, click
More Info.

Enter the additional ticket information and save your changes.
3
Configure Ticket Type and Additional Options
Use Ticket Type to categorize attendees or tickets.
The available ticket types include:
Admission
Differentiates an attendee as a standard admission. Exhibitor
Differentiates an attendee as an exhibitor. Sponsor
Differentiates an attendee as a sponsor. Speaker
Differentiates an attendee as a speaker. Seats
Used to select seats from a predefined layout. Currently in development. Seminars
Used to create seminars. Booths / Tables
Used to display exhibitors in the exhibitor tile in the Eventdex App. Sponsorship
Used to display sponsors in the sponsor tile in the Eventdex App. Items
Used to add items. Staff Admissions
Used for staff admissions. Eventdex Products:
Ticket types can also provide access to Eventdex products such as
Lead Retrieval and Scan Attendee. Lead Retrieval
Gives an exhibitor access to the Eventdex Lead Retrieval app. Scan Attendee
Gives event administrators or organizers access to the Scan Attendee app for event management and onsite activities. 4
Configure Ticket Settings
Configure the ticket settings according to your event requirements.
Ticket Visibility
Choose Public, Private, Closed, or Sold Out. Tax Rate
Turn tax ON or OFF for the ticket. Onsite Visibility
Enable the ticket for onsite sales through the portal. Scan Attendee Onsite Visibility
Enable the ticket for onsite sales through the Scan Attendee app. Allow Matchmaking
Enable if the ticket holder participates in Matchmaking. Allow Roundtable
Enable if the ticket holder participates in Roundtable. Tags
Add tags to the ticket. Ticket Image
Add an image to the ticket. The image cannot exceed 100 KB. Badgable
Determines whether a physical admission ticket receives a badge at the event. Badge Label
Defines the label displayed on the attendee badge. Allow Wait List
Enable when the ticket should support a waitlist. Attendee Validation
Use when invited attendees register while skipping ticket selection. Skip Ticket Listing
Skips ticket selection and redirects the user to the registration form. Ticket Description
Add a short description for the ticket. Sale Start Date
Set the date when ticket sales begin. Sale End Date
Set the date when ticket sales end. Qty
Set the number of tickets available for sale. Order Min-Qty
Set the minimum quantity a registrant must purchase. Order Max-Qty
Set the maximum quantity a registrant can purchase. Price
Set the ticket price. Ticket Visibility:
Public tickets are displayed on the registration page.
Private tickets require a Private Registration Link.
Closed tickets are not displayed on the registration page.
A ticket can also be changed to Sold Out. 5
Apply the Ticket Settings
Click Apply to save the ticket’s additional settings.
Need to exit?
Click Cancel to leave the Ticket More Info screen
without applying your changes. 6
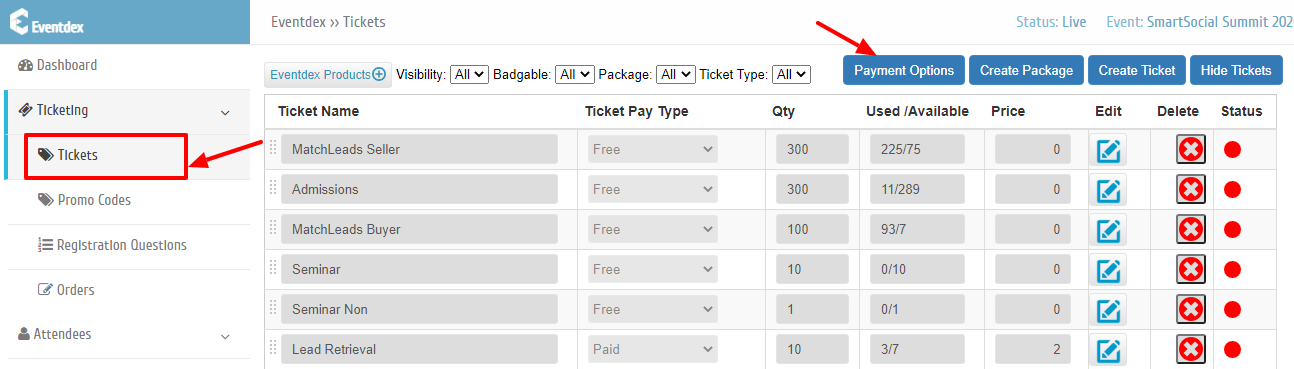
Configure Payment Options
Click Payment Options to select the payment gateway
settings for your event.
View the list of supported Eventdex payment gateways →
7
Save the Ticket
Click Save to save the ticket and payment gateway settings.
02 · TICKETS
Edit or Delete a Ticket
1
Edit a Ticket
Go to Tickets and click More Info
next to the ticket you want to edit.
Update the ticket information, then click Apply
at the bottom of the popup to save your changes.
2
Delete a Ticket
Important:
Sold tickets or packages cannot be deleted.
You can delete a ticket from either:
Edit Event screen →
Manage Ticket screen →
3
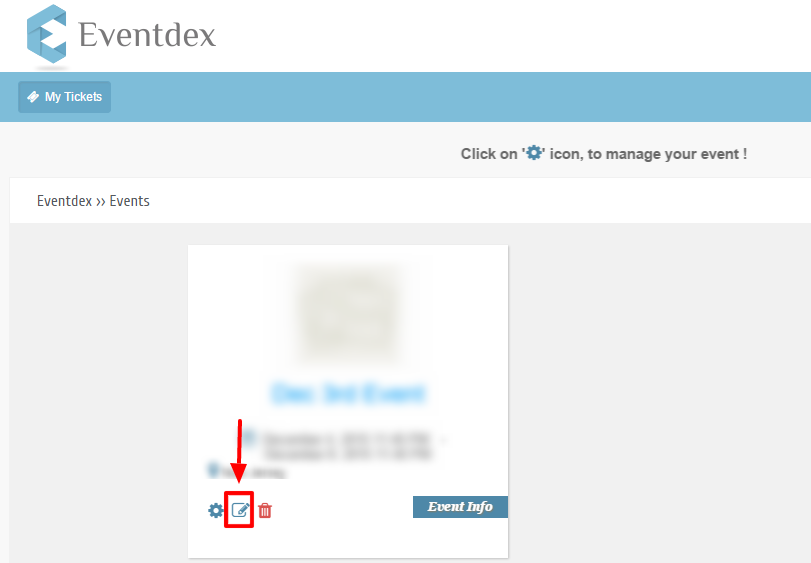
Delete from the Edit Event Screen
Go to the Events page and click
Edit Event.
In the Create Tickets section, click
Delete next to the ticket you want to remove.
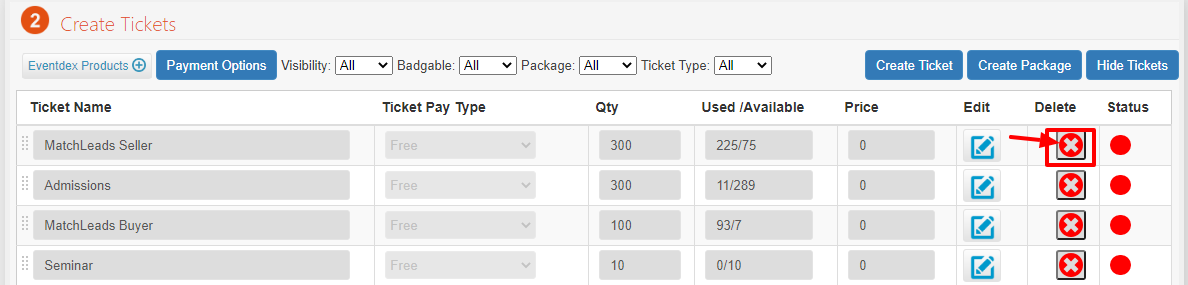
A confirmation message will appear:
“Are you sure you want to delete”
Click OK to delete the ticket, or
Cancel to close the confirmation without deleting it.
4
Delete from the Manage Ticket Screen
Important:
Sold tickets or packages cannot be deleted.
Go to the Events page and click
Manage Event.
Open the Tickets tab and click
Delete next to the ticket you want to remove.
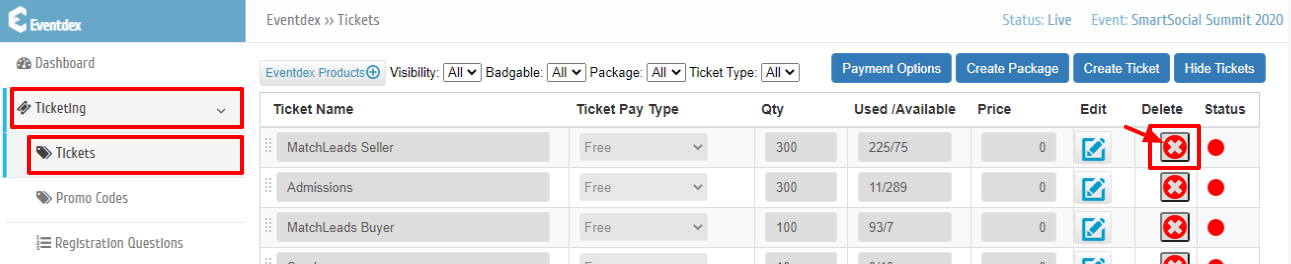
A confirmation message will appear:
“Are you sure you want to delete”
Click OK to delete the ticket, or
Cancel to close the confirmation without deleting it.
03 · PACKAGES
Create a Package
Go to
Eventdex >> Ticketing >> Tickets >> Create Package.
1
Open Create Package
Go to Tickets and click
Create Package.
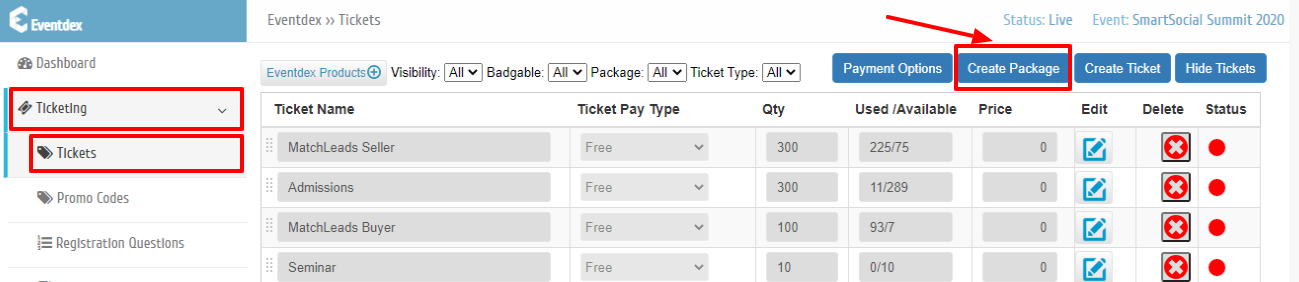
2
Enter Package Details
Enter the basic package information and click
Save.
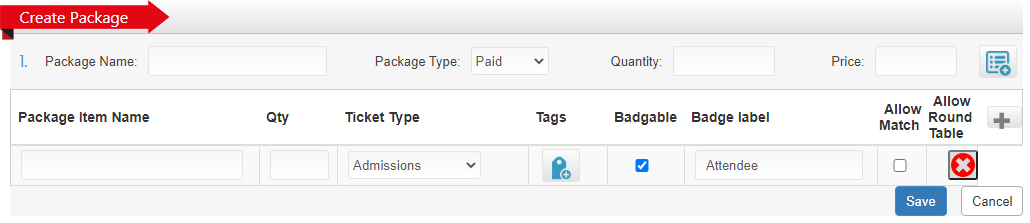
3
Add More Package Information
Click More Info to configure additional package settings.
Package Image
Image size cannot exceed 100 KB. Package Type
Paid, Free, or Donation. Ticket Type
Set to Package by default. Package Visibility
Public, Private, or Closed. Tax Rate
Turn tax ON or OFF for the package. Package Description
Add a description for the package. Order Min-Qty
Minimum quantity a registrant must purchase. Order Max-Qty
Maximum quantity a registrant can purchase. 04 · PRICING
Set Up Early Bird Tickets
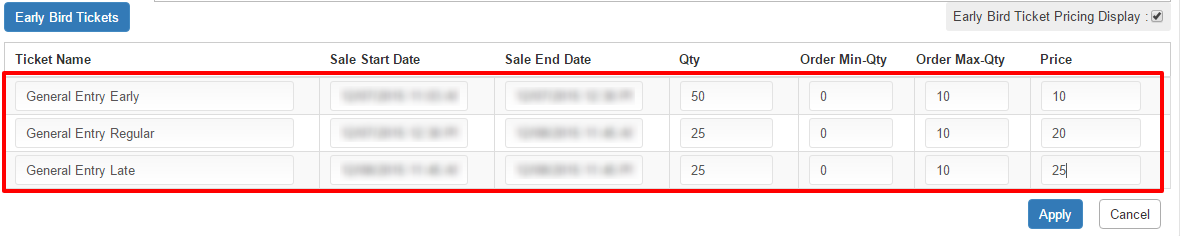
Early Bird Tickets allow you to define different sale periods,
quantities, and prices for Early, Regular, and Late ticket sales.
1
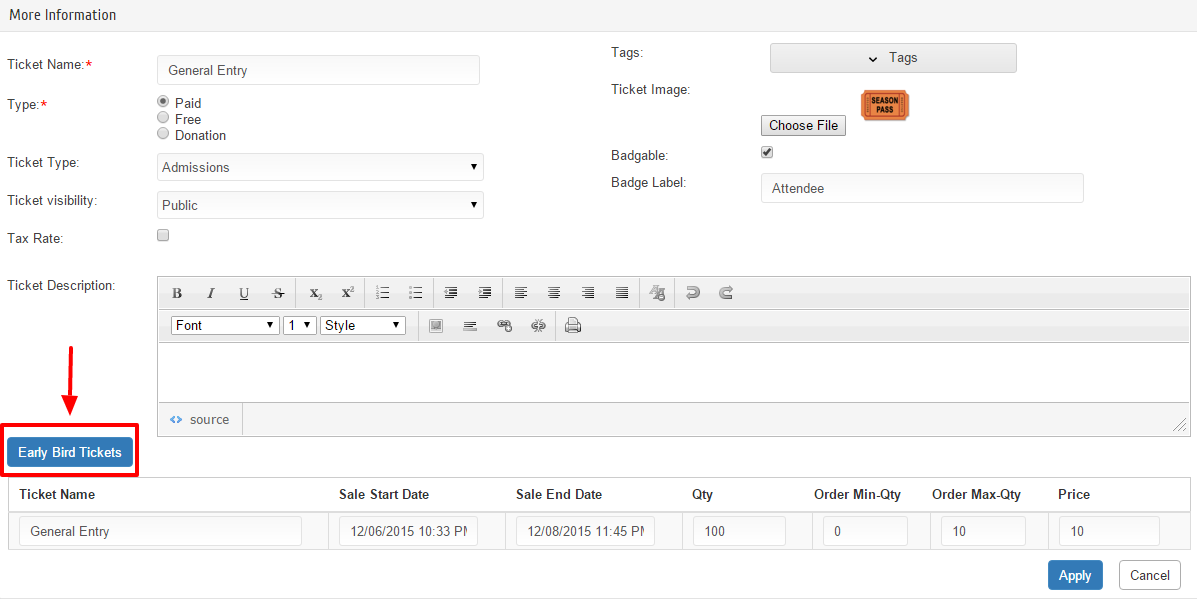
Open Early Bird Tickets
Click More Info next to the ticket for which you
want to configure Early Bird pricing.
Click Early Bird Tickets.
2
Configure Early, Regular, and Late Pricing
Enter the sale start date, sale end date, quantity, and price
for each Early Bird ticket period.
3
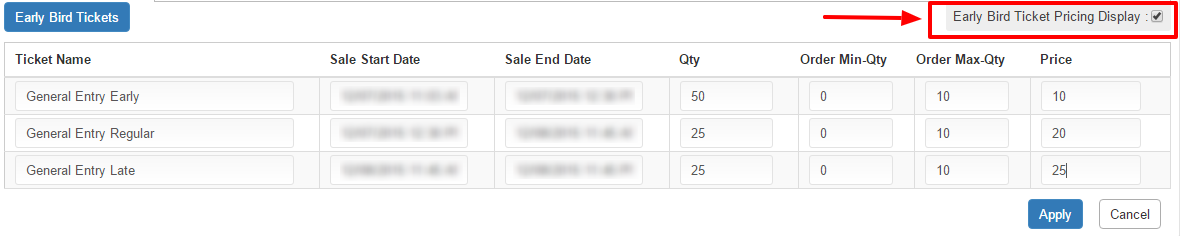
Choose Early Bird Pricing Display
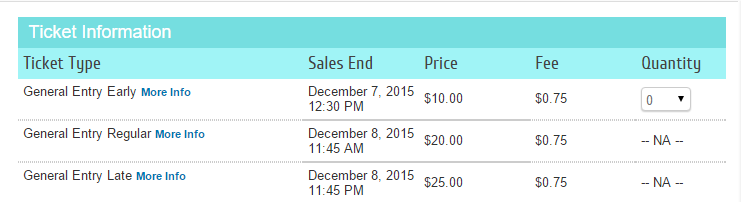
ON by default:
When enabled, the registration page displays Early, Regular,
and Late tickets with their ticket prices and sale end dates.
Registrants can purchase the ticket that is active at that time.
OFF:
When disabled, the registration page displays only the ticket
that is currently active.


05 · ORGANIZATION
Manage Ticket Tags
Tag managementAdd a Tag →
Edit / Delete a Tag →
Assign a Tag → 1
Add a Tag
Open the Ticket More Info screen from either
the Edit Event screen or the
Manage Ticket screen, then click
Tags.
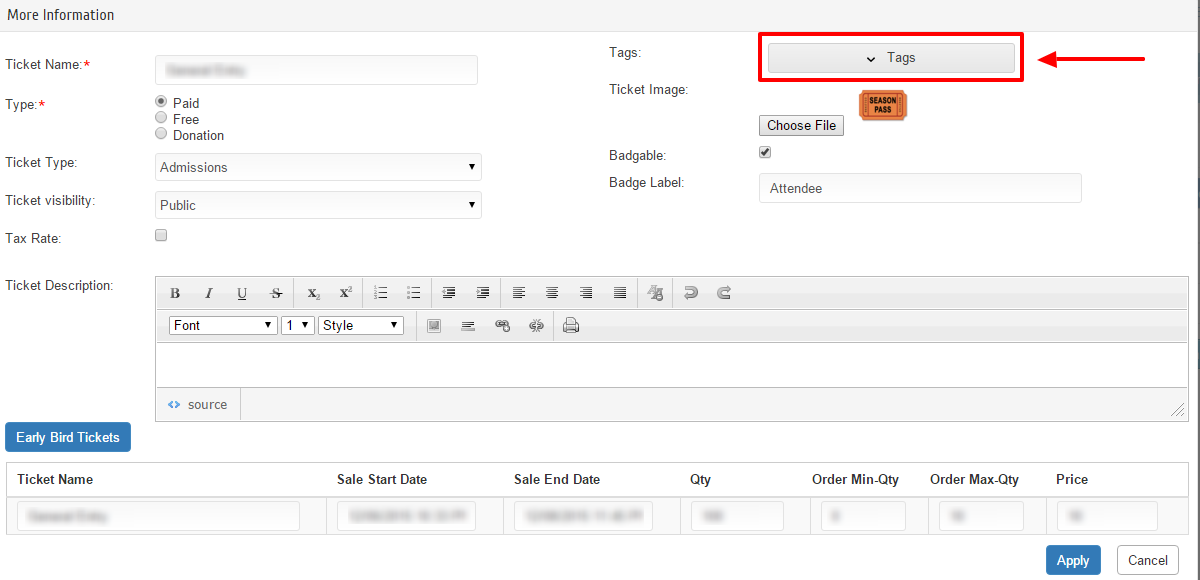
Click Add Tags.
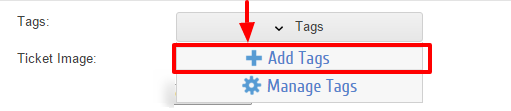
Enter the tag name and click Save.
The newly created tag will then appear under Tags.
2
Edit a Tag
Go to Tags and click
Manage Tags.
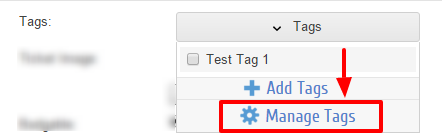
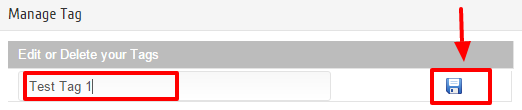
Click Edit next to the tag you want to update.

Update the tag and click Save.
3
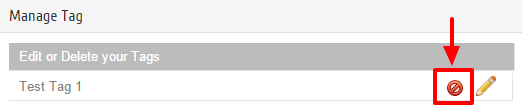
Delete a Tag
Go to Tags and click
Manage Tags.
Click Delete next to the tag you want to remove.
4
Assign a Tag to a Ticket
Open the Ticket More Info screen and click
Tags.
Select the required tag from the list of available tags.
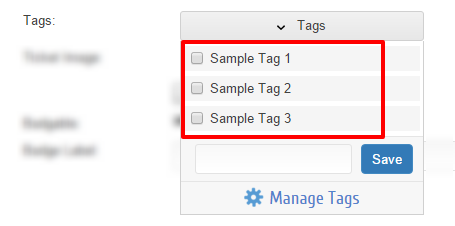
Click Apply at the bottom of the page to save
your changes.
06 · ORDERS
Cancel an Order
1
Open Orders
From the Eventdex App Dashboard, select
Ticketing, then select
Orders.
Alternatively, go to
Eventdex >> Ticketing >> Orders.
2
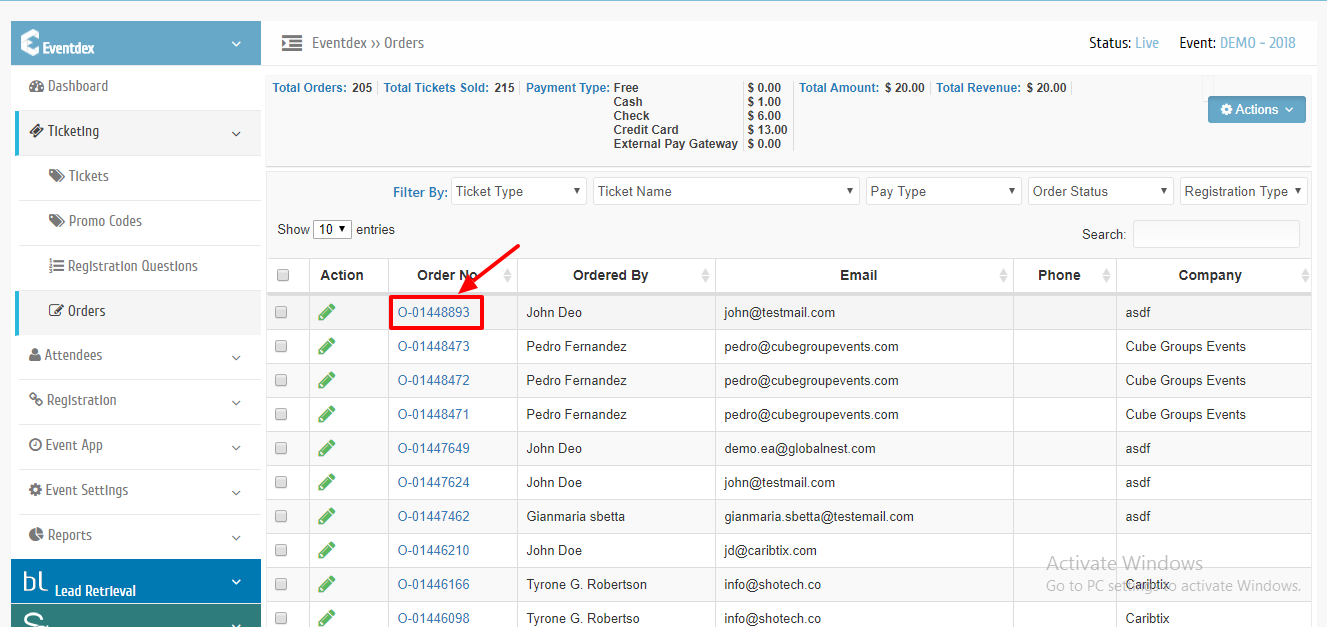
Select the Order
Select the order you want to cancel from the order list.
3
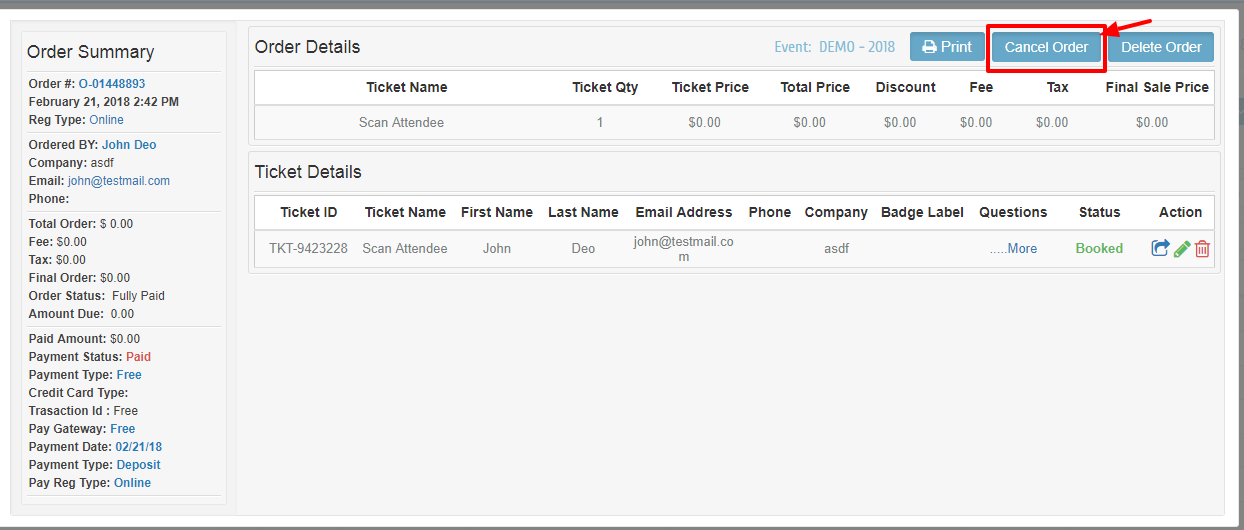
Cancel the Order
Click Cancel Order to confirm the cancellation.
07 · ORDERS
Check Order Status
1
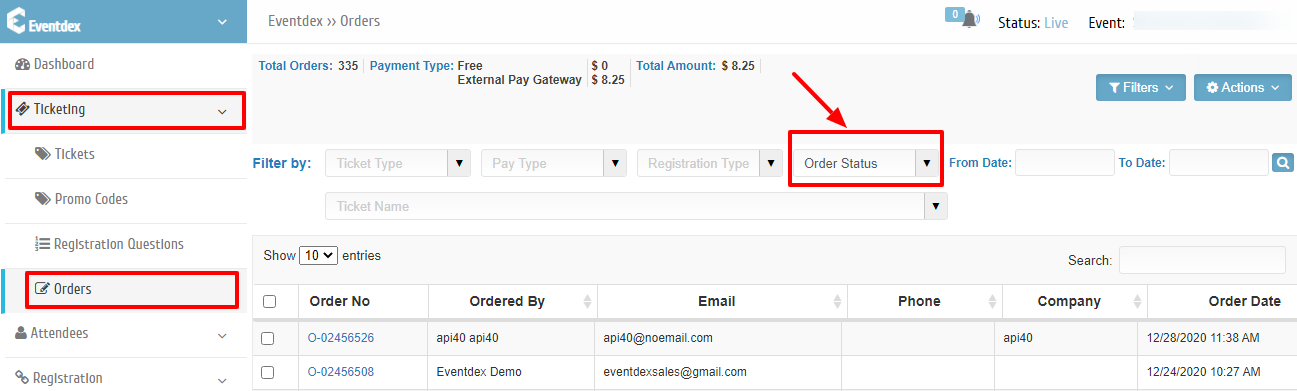
Open Orders
From the Eventdex App Dashboard, select
Ticketing, then select
Orders.
Alternatively, go to
Eventdex >> Ticketing >> Orders.
2
Select an Order Status
From the Order Status tab, select the required
order status from the dropdown menu.
3
Filter the Orders
Select and filter the required orders based on the selected
Order Status.
08 · REGISTRATION
Add Registration Questions
Use Registration Questions to collect additional information from
attendees during registration.
1
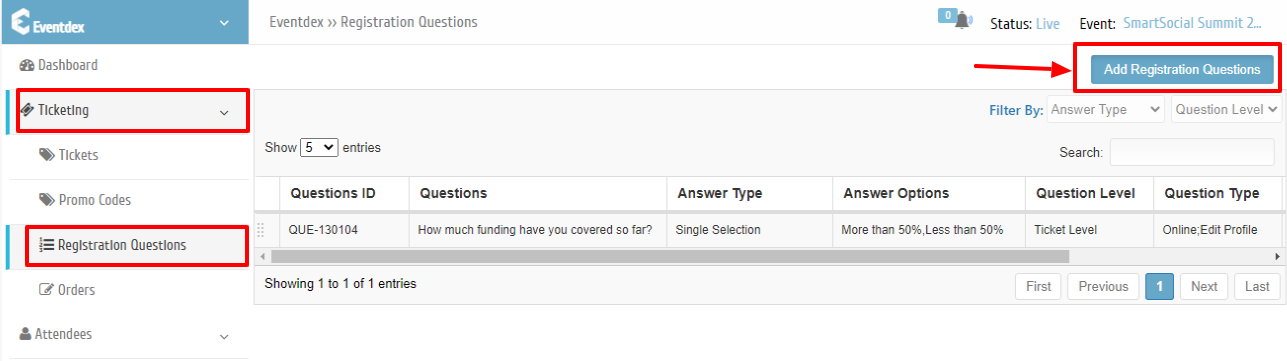
Open Registration Questions
Go to
Eventdex >> Ticketing >> Registration Questions.
2
Add a Registration Question
Click Add Registration Questions.
3
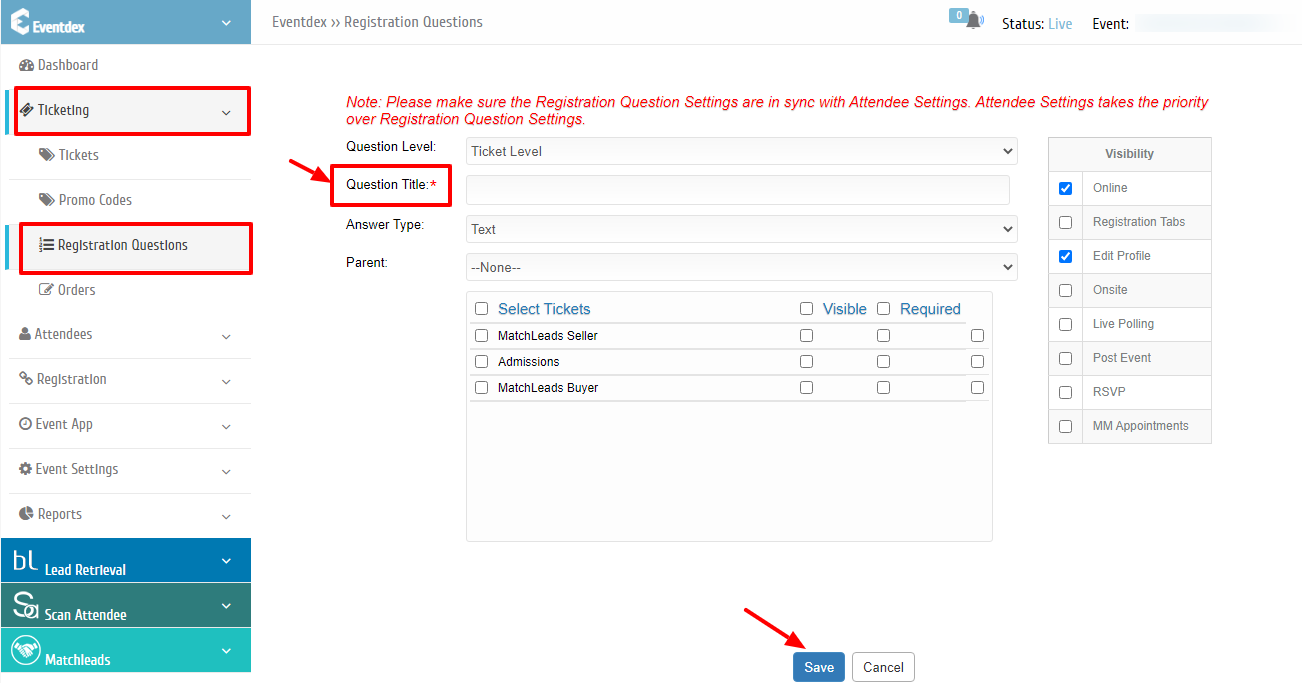
Enter the Required Information
Enter the required information and click Save.
You’re all set!
You can now create and manage tickets, packages, Early Bird pricing,
tags, orders, and registration questions for your Eventdex event.
Quick links
Create Ticket →
Edit / Delete Ticket →
Create Package →
Early Bird Tickets →
Manage Tags →
Cancel an Order →
Check Order Status →
Registration Questions →